Working with Ethereum Smartcontracts
Ethereum Smart Contract Deployment Architecture
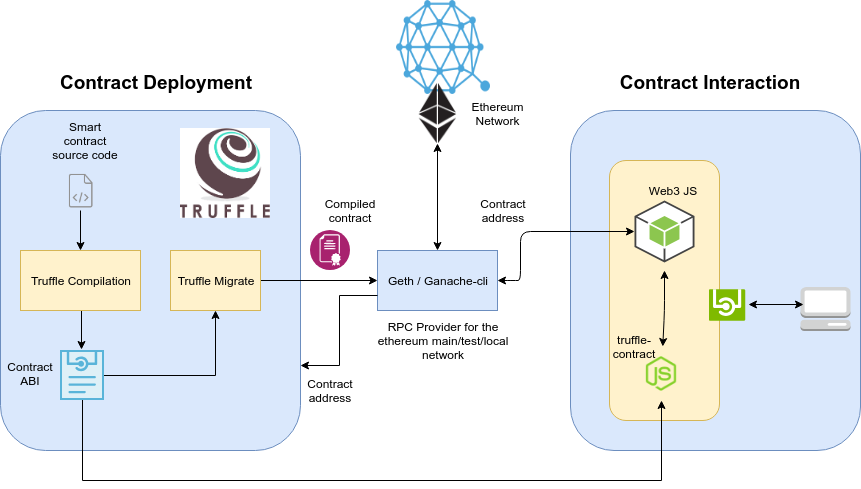
Deploying an ethereum smart contract
Deploying a smart contract is the process of getting a smart contract address (instance of a smart contract) and an ABI from the source solidity files being deployed into an ethereum network.
Frameworks Explained
Truffle
A development environment, testing framework and asset pipeline for Ethereum. In other words, it helps you develop smart contracts, publish them, and test them, among other things.
Install
npm install -g truffle
Ganache-cli
Creates a virtual Ethereum blockchain, and it generates some fake accounts with test ethers that we will use during development.
Install
npm install -g ganache-cli
Start network
ganache-cli --defaultBalanceEther 100000000 -p 8545
Truffle Initialization
mkdir sample-app
cd sample-app
truffle init
Truffle network configuration
Truffle allows you to configure multiple networks like ganache-cli (for local), geth/infura for testnet, mainnet etc and point to the needed network at the time of deployment with a flag –network <name>
In truffle.js file,
module.exports = {
  networks: {
    development: {  // Can be a ganache-cli RPC
      host: "127.0.0.1",
      port: 8545,
      network_id: "*"
    },
    tesnet: {  // Can be a a geth instance
       host: "127.0.0.1",
       port: 7545,
       network_id: 3,
       gas: 4000000
    }
  }
};
Truffle Compilation
This involves compiling the solidity source code and getting the ABI of the smart contract. The source code of the contract must be placed in the contracts/ directory of the truffle project and the ABI will be available under build/contracts/ directory
Folder structure:
contracts/ - for source .sol files - Ex: MyContract.solbuild/contracts/ - for the generated ABI - MyContract.json will be generated
Command:
truffle compile
Truffle Migration
The compiled bytecode of the smart contract is deployed to the ethereum network via any RPC provider like geth, ganache-cli or parity or infura.
Migrations are JavaScript files that help you deploy contracts to the Ethereum network. These files are responsible for staging your deployment tasks, and they’re written under the assumption that your deployment needs will change over time.
Folder structure:
migrations/ Place all the migrations file here
Sample migration script:
var myContract = artifacts.require("MyContract");
module.exports = function(deployer) {
  deployer.deploy(myContract);
};
Command:
truffle migrate --network local
This will run all migrations located within your project’s migrations directory to the network named local in your truffle.js . At their simplest, migrations are simply a set of managed deployment scripts.
Account Setup
For ganache-cli:
By default, 10 random accounts will be generated with pre-loaded ether balance for your local network. You can access any of the accounts for your deployment usage, just like accessing any array element with index.
module.exports = function(deployer, network, accounts) {
var myContract = artifacts.require("MyContract");  // This will search for MyContract.json in build/
  deployer.deploy(myContract, {from: accounts[0]);  // Deploy the contract with the first account
}
For geth:
In case of geth, you need to create a new account with wallets like metamask and have the account address and passphrase ready with you to unlock the account before deploying.
function web3AsynWrapper (web3Fun) {
  return function (arg) {
    return new Promise((resolve, reject) => {
      web3Fun(arg, (e, data) => e ? reject(e) : resolve(data))
    })
  }
}

module.exports = function(deployer, network, accounts) {
  var unlock = web3AsynWrapper(web3.personal.unlockAccount);
  unlock("address", "passphrase", 36000).then(function(res){
  // Deployment script
  });
};
If deployment is successful, it will return the deployed address of the smart contract. This smart contract address along with the ABI is needed to interact with this deployed smart contract in future if we need to invoke any of the smart contract methods.
Interacting with the ethereum smart contract
This involves invoking the methods of a deployed smart contract to write into the blockchain state or read from the state.
Frameworks Explained
Web3 JS
Ethereum JavaScript API, a collection of libraries which allow you to interact with a local or remote ethereum node, using a HTTP or IPC connection.
Install
npm install web3
Truffle contract
Better Ethereum contract abstraction, for Node and the browser. It enables directly calling a smart contract method in similar syntax to calling any java or JS object method instead of sending raw transaction over network.
Install
npm install truffle-contract
Configuring the ethereum network provider
Before interacting with the smart contract over the network, we need to set the network provider which provides the RPC interface to interact with the smart contract.
const ETHEREUM_NETWORK_PROVIDER = "http://localhost:8545";
const Web3 = require('web3');
const provider = new Web3.providers.HttpProvider(ETHEREUM_NETWORK_PROVIDER);
const web3 = new Web3(provider);
Getting the smart contract instance
To get an instance of the smart contract from a running ethereum network, we need to first have the ABI. of the deployed smart contract and the smart contract address.
const contract = require('truffle-contract');
async function getContractInstance(abiFile, address) {
  // contractsAbiPath will be the build/contracts path
  // Ex: /sample-project/build/contracts
  // abiFile - Ex: MyContract.json
  const abi = JSON.parse(fs.readFileSync(`${contractsAbiPath}/${abiFile}`, 'utf8'));
  const Contract = contract(abi);
  Contract.setProvider(provider);
  const instance = await Contract.at(address);
  return instance;
}
Invoking the smart contract methods
Once we get an instance of the smart contract from the network, we are ready to invoke with any of the public methods.
Consider the below smart contract with a read and write method to read and write the age for a person.
pragma solidity ^0.4.23;
contract MyContract {
  private uint256 age = 0;
  function readMyAge() public view returns(uint256){
      return age;
  }

  function writeMyAge(uint256 _age) public {
      age = _age;
  }
}
Calling a read method
Calling a read method is as simple as calling the method for any on JS or java object.
Refer the previous section for the definition of getContractInstance method.
async getAge() {
  try {
      // xxxxx is the deployed smart contract address
    const contract = await getContractInstance('MyContract.json', "xxxxxxx");
    const age = this.contract.readMyAge();
    return reached;
  } catch (error) {
    logger.error(error.stack);
  }
}
Calling a write method
Caling a write method involves submitting a transaction to the underlying network and hence we need a valid ethereum wallet address and private key that we own from which we should submit the transaction.
async setAge(age) {
  try {
      // xxxxx is the deployed smart contract address
    const contract = await getContractInstance('MyContract.json', "xxxxxxx");
    const method = await this.contract.writeMyAge.request(age, "xxxxxxx");
    const { data } = method.params[0];
    submitTx(data);
    return reached;
  } catch (error) {
    logger.error(error.stack);
  }
}
The above method creates the hex data for the writer method that we are about to call along with the params for the method.
const ETHEREUM_NETWORK_PROVIDER = "http://localhost:8545";
const Web3 = require('web3');
const provider = new Web3.providers.HttpProvider(ETHEREUM_NETWORK_PROVIDER);
const web3 = new Web3(provider);
const EthereumTx = require('ethereumjs-tx');
async submitTx(data, to) {
  try {
    const from = <your ethereum wallet address>;
    const secretKey = <your private key of wallet>;
    const txCount = web3.eth.getTransactionCount(from);
    const txParams = {
      from,
      to,
      data,
      value: 0x0,
      nonce: web3.toHex(txCount)
    };
    const gas = web3.eth.estimateGas(txParams);
    txParams.gasLimit = web3.toHex(gas + 1000);
    txParams.gasPrice = web3.toHex(web3.eth.gasPrice.add(10000000));

    const tx = new EthereumTx(txParams);
    tx.sign(secretKey);
    const serializedTx = tx.serialize();
    web3.eth.sendRawTransaction(`0x${serializedTx.toString('hex')}`, (err, hash) => {
      if (err) return err;
      if (hash) return hash;
    });
  } catch (error) {
    console.log(error.stack);
    return error;
  }
}
Let us see the critical line of codes in detail:
const from = <your ethereum wallet address>;
const secretKey = <your private key of wallet>;
Have these values configured in some env file for security purpose and make sure you own this.
const txParams = {
      from,
      to,
      data,
      value: 0x0,
      nonce: web3.toHex(txCount)
 };
Value is zero, because we are not transferring any ETH in this tx. And nonce must be always one greater than the prev tx of the from account,
const gas = web3.eth.estimateGas(txParams);
txParams.gasLimit = web3.toHex(gas + 1000);
“Gas” is the name for a special unit used in Ethereum. It measures how much “work” an action or set of actions takes to perform.
Here we estimate the amount of gas that is likely to be consumed for this transaction and add some buffer for our safety to avoid out of gas exception because in times of peak load, gas consumption may increase.
txParams.gasPrice = web3.toHex(web3.eth.gasPrice.add(10000000));
Gas price is the amount of weis we are ready to pay per gas unit for this tx. | We increase the gas price if we have enough funds and want to get our tx mined sooner since miners always mine the tx with higher gas price first. | 10000000 is the weis we are adding as extra to make our tx mine faster but that depends on your priority. | After the mining of this tx, you will lose txParams.gasLimit * txParams.gasPrice weis from your wallet balance as tx fee.
tx.sign(secretKey);
Signing the tx with our private key
web3.eth.sendRawTransaction(`0x${serializedTx.toString('hex')}`
Here we are submitting the transaction to th enetwork on our behalf. If everything goes well, we will get the hash of the submitted transaction in return.
We can check the status of the transaction if mined by checking the tx status in the network. use the below code snippet.
const receipt = web3.eth.getTransactionReceipt(hash);
If receipt is null, it means the tx is yet to be mined
Once the tx is mined with success, you can now again call the getter method like,
const contract = await getContractInstance('MyContract.json', "xxxxxxx");
const age = this.contract.readMyAge();
And check if the age we are getting is the updated one that we passed as argument in the write method.